Pages

Thursday, February 28, 2013

A Last Minute Pin and the Wrap-Up

Another Pin It/Do It Challenge is at an end, but I managed to slip one final project under the wire.  I signed up for an Easter swap on the Farm Girl Sisterhood, so I was browsing my Pinterest craft board for ideas to include.  I found this little basket from Ayumi at Pink Penguin:

With the right fabric, it could look Easter-ish, so I dug through my stash and found a cheerful floral and coordinating pink print.  I chose to skip the patchwork portion - mainly because I didn't want to dig for more fabrics.  I'm very happy with the finished project.  The base measures approximately 6"x4" and it's about 6" tall - perfect for holding a few Easter goodies.  Or - on the bathroom counter for makeup, in the sewing room for catching fabric scraps, on the end table to hold bookmarks, pens and sticky notes for reading.  I may be whipping up lots of these. The whole thing, including looking for fabric, took less than an hour.

Here's my finished basket.  If you happen to be my partner for the Easter swap, don't look!

The basket brings my total for the February challenge to 11.  

  1. Pillowcase Apron
  2. Iced Green Tea Lime Cooler
  3. Baked Zuchinni Sticks
  4. Gift Tags
  5. Georgia Peach
  6. Rolled Paper Cross
  7. Coffee Mug Pincushion
  8. Chair Arm Pincushion
  9. 100 Calorie Snack Packs
  10. Beach Signs
  11. Fabric Basket

The Pin It/Do It Challenges are hosted by Trish @ Love, Laughter and a Touch of Insanity.  They usually roll around every 3-4 months, so keep your eye on her blog or watch for an announcement here, and join in next time.

Wednesday, February 27, 2013

Sew Wonderful

As part of the Farmgirl Sisterhood, I have been earning various badges. I will be using the blog as a way of documenting them for my own use, and possibly for your amusement.   So far I have received first level badges for Water Conservation and Quilting, and have applied for my first level Apron badge. The most recent badge I've applied for is the "Sew Wonderful" badge.  

The requirements for the badge are to put together a basic sewing supply kit - various colored threads, scissors, needles, pins, etc. - and to make a pin keeper of some sort.  Since I've been sewing off and on for years, I already had those supplies and more.  My issue is finding them when I need them.  I have a tendency to lay things down wherever is handy while I'm working.  "A place for everything and everything piled haphazardly."  Think I'm exaggerating?  See for yourself.
There's a trash can under the table, but obviously my aim stinks.  The plastic tote and the shopping bag on the floor of the closet hold my fabric stash - but the stash has outgrown the space and when I'm looking for something, everything gets dumped.  Same with my sewing tools.  You can't see it in this shot, but there is a lovely cabinet on the wall which my father built many years ago to hold my mom's sewing supplies.  Still, the supplies I've been using are laying on the table, the ironing board or the floor.  

My project for the badge was to sort, organize and store my supplies so that I can find them when I need them without having to dig through everything else.  It took a chunk of an afternoon, but everything is put away with like objects - all ribbon spools hanging together, bias tape in one cubby, snaps and Velcro in another, buttons gathered into a plastic bin, etc.  

The biggest sorting job was fabric, so I spread it out on the living room floor, divided it according to size, and stored it so that I can find what I need, whether it's a full yard or a six-inch square.   Fabrics for projects in progress are in the shopping bag. 
On the table, scissors and other tools I need frequently are in the cute pink craft tote I found in a box of things Amanda left behind when she went to college.  Supplies for other crafts are in the plastic drawer units.

As for the pin keeper requirement for the badge, I've previously shared one I made from a keepsake coffee mug and one I made for the arm of my chair.  Anyone want to lay odds on how long my sewing room will look this way?


Tuesday, February 26, 2013

Needlework Tuesday

Welcome back to Needlework Tuesday, hosted by Heather from Books and Quilts.  Don't you love the way I say that like I participate on a regular basis?  At best, my participation is sporadic, but I love checking in with Heather's beautiful projects and the others who link up.  

The last time I checked in, it was to show my progress on my Christmas mini-quilt.  It's finally finished!  And it's not even March.  I'm just considering myself way ahead of schedule for next Christmas. This quilt was based on a pattern I saw on Pinterest and selected to use up some large-scale Christmas fabrics left from other projects.  I'm happy with the finished product.  It's festive and cozy (flannel backing) and the perfect size for covering my legs and toes on a chilly evening. Here's the finished quilt:

If you're just visiting for Needlework Tuesday, or if it's your first time here, here are a few other things I've been stitching.
Clothespin apron
Chair Arm Pincushion


Monday, February 25, 2013

Oscars Best and Worst

Welcome to the second annual Just One More Thing Fashion Oscars!  I love to watch the Oscars to see what everone's wearing - I've seen very few of the nominated films.  I loved this year's tribute to musicals, so watching the actual Oscar ceremony was more interesting than usual.  Though I can't comment on which movies should have won, here's my thoughts on and selections for Best and Worst Dressed, as well as some other random topics:

Best Dressed:


Kristin Chenoweth's dress reminded me of Grace Kelly's dress in Rear Window - classic and elegant.

Sandra Bullock is always stunning and understated - right down to the simple hairstyle with a single clip behind her ear.

Zoe Saldana made my list for being unique without being off-the-wall.

It seemed that celebreties were afraid of color this year - lots of white, gold, and beige.  Robin Roberts' dress was the most beautiful shade of blue and made her look gorgeous.

Honorable Mention: 

Charliz Theron's and Jennifer Lawrence's dresses were both beautiful but slightly "standard".

Worst Dressed:

Anne Hathaway's Prada dress featured unfortunate darts and puckered seams that made it look like a homemade prom dress.  How does that happen at Prada?

Brandi Glanville (Real Housewives of Beverly Hills), who isn't even a real celebrity, still wins the hands-down worst dressed spot, based solely on the slutty factor of her wardrobe-malfunction-waiting-to-happen.  

My daughter once had a fake-fur rug in her room.  When I tried to launder it, it turned into a blob of matted fiber.  That's what Amy Adam's dress reminded me of.  And, again, from a legendary designer, Oscar de la Renta.  Go figure!

Helene Bonham Carter - frumpy, sloppy shreds.  'Nuff said.

Men's Department:  Men get off so easy - a black tux is a black tux is a black tux.  But there were a couple who stood out, for good or bad, but pictures of men are tougher to find. 

George Clooney - I just don't know what to say.  How can someone usually so handsome and polished look so scruffy and unkempt?  Evidently razors are "out" in Hollywood - as modeled by Clooney, Joaquin Phoenix, Tommy Lee Jones, Ben Affleck and Phillip Seymour Hoffman.  Not a trend I'm fond of.

John Travolta - In all black (tux,shirt and tie), he made up for Clooney.

Samual L. Jackson win's most original in burgundy (velvet?)

And finally, Jane Fonda gets her own category:
I'm not a fan of the neon yellow, but the cut and style were beautiful and if Google didn't tell me so, I would never believe she's 75.  Winner!

Who were your favorites?


Sunday, February 24, 2013

Getting the Cart Before the Horse . . .

I love crafting and sewing, but sometimes I get so excited for the finished product that I don't adequately plan and I end up wishing I had taken the time to decide what I really wanted before I started.  Case in point - I recently joined the Farmgirl Sisterhood and needed a place to preserve/display the badges I've been earning.  So I purchased a kit through Mary Jane's Farm for this tote bag:

Adorable, isn't it?  My plan was to sew the completed badges on the reverse side.  But when the kit arrived, I changed plans (so what else is new?).   I didn't want a tote that looked like everyone else's tote, I needed to personalize it.  "Wait a minute!" I told myself, "If you didn't want it to look like the picture, why did you buy the kit?  You spent good money on this kit, you really ought to follow the instructions."  And the obedient, rule-following, don't-get-out-of-line girl in me agreed.  So, I swapped out the brown fabrics for my own aqua kitchen print that I love, and replaced the "fetchin" embroidered square with my membership badge.  It looked like this:


Also kinda cute.  But while the tote sat in my sewing room waiting for me to attach the badges, the rebellious, free-thinking, I-don't-need-no-stinking-rules girl in me kept nagging that it really wasn't what I wanted.  Although it's cute, the fringe and chenille really aren't "me".  Now compliant girl and rebel girl were having an arguement:  "You bought the kit and this is what you're supposed to do with it.  If you aren't going to follow the instructions, you have wasted the money."  "You have to be unique. No one can tell you how you have to decorate your tote bag!"  Yada yada yada - back and forth.

Rebellious girl won.  Rule girl finally admitted that, yes, I could have saved money by buying a plain tote and starting from scratch, but also acknowledged that I probably wouldn't have without the inspiration of the kit.  Either way, the money is spent and having a bag I'm not happy with and don't use is wasteful also.  So, I took everything off the bag and started over. (Rule girl was sure to save the pieces to be used in a future project.)  It's got a vintage feel, it incorporates quilting, the off-set pocket and badge are a bit quirky, and it's pretty.  I'd say I captured "me" pretty well.  I plan to get the badges attached to the back this weekend and keep the bag in my car to use as a shopping bag for those quick stops I frequently make to pick up only a few items.

The moral of my silly story is best summed up by country music legend Dolly Parton:
"Find out who you are and do it on purpose."


Saturday, February 23, 2013

Old Dogs and New Tricks


Image from www.chappellroberts.com
On January 2 of this year, my sister, Teri, posted a challenge on her blog:
It's a New Year and I'll be 54 soon . . . and 54 is not too old to learn something new!  Right?  So, I challenge you to learn something new in 2013!  Pick five things, big or small, that you have always wanted to be able to do. Maybe it is something that you need to learn to help you with your job or with your life, but also, just think of some things you want to learn for simple fun! 
She quickly came up with the first four things she wanted to learn and added her 5th one recently.  Teri wants to:
  1. learn basic gun safety/shooting
  2. learn basic algebra (her daughter is a math teacher)
  3. be CPR certified (done!)
  4. learn to knit
  5. learn to line dance

I've had a bit more trouble deciding what I want to learn.  It would be easy to pick five new crafts to learn, but I'm trying to use this challenge to branch out and try something totally out of my usual realm.  Easier said than done!  So I'm starting here - I want to learn to:

     1.  Crochet.  I can make a chain, but that's it.

     2.  Tat lace.  A lady who lived near us when we were growing up showed me the basics, but I haven't tried it for over forty years.

     3.  Load/shoot a gun(s).  This is not really a "want to", it's a "need to".  I've been around guns all my life - grew up in Kansas, we hunt.  I do know basic gun safety and I have shot, but my knowledge is minimal.  We live in a secluded area and it's a weird world out there - I need to be comfortable with the guns that are in our house. 

      4.  Camp.  I have always been an "indoor" girl.  I used to have a magnet on my fridge that said "My idea of roughing it is when room service is late."  But, since moving to Green Acres, I've learned to love the beauty and peace of the outdoors.  So this summer I want to give camping a shot.

     5.  a topic yet to be determined

I'll be reporting back on how my lessons are going.  Care to join me?  You're never too old - or too busy, or too educated - to learn something new.  Stop by Teri's blog, Henningsen Happenings,  and leave her a comment - then go back to link up posts about what you learn.

Friday, February 22, 2013

"...And They Ate And Were Satisfied"

*I wrote this post before Ash Wednesday, but never posted it.  I'm not sure why - maybe I thought posting it would force me to stick to it; maybe I thought readers would think it silly; maybe I thought readers would find me fanatic.  Whatever the reason, here it is, a week late - and for better or worse, this is my blog so this is me, this is what I believe.

I usually try to avoid religion and politics on the blog.  Not that I have ever hidden my affiliations or beliefs, but I don't put them front and center either.  For the most part, the blog is for fun stuff.  Also, the topic of food "addiction" (let's just call it what it is!) is very personal for me.  By posting this I am opening myself up for a lot closer scrutiny than I'm usually comfortable with, but I think it could potentially be beneficial to others who struggle with weight and over-eating, like I do.  If you disagree or find nothing helpful here, that's fine.  Visit tomorrow and we'll be back to goofing around.  If you gain something of use for your own battle, wonderful!  

My weight-loss "journey" has so far been a pretty basic plan - healthier food choices, proper portion sizes, exercise more (or at all).  And it's been successful.  I'm thinner and happier but I still haven't broken the final barrier - the desire to eat.  I've learned to pick up an apple instead of a Snickers.  I've learned I like asparagus.  I've learned that the extra half-mile on the treadmill really won't kill me.  But I have not learned to put food in it's proper perspective.  The urge to eat for solace or celebration or to pass the time or because I just LIKE the taste of frosting, has not gone away.  I'm better at fighting the battle, but the war is far from over.  
Image from Catholic-Link.com

Lent is traditionally a time when we "give up" something - sweets, fast food, soda, TV... I've participated a few times, but mostly on a surface level - just to see if I could. The tradition is not emphasized in most Protestant churches, so when I was struck with the idea that Lent might be the opportunity to get past my food issues, I turned to the Catholic Church.  In fact, parts of this post are blatantly plagiarized from the United States Conference of Catholic Bishops (www.usccb.org), although, now that I've confessed that, maybe it's no longer plagiarism?  Thank you to the USCCB for there info and insight.


The goal in the tradition of “giving up” is not just to have the willpower to give up something for 40 days, knowing I’ll get it back at the end, but to give up a habit of sin and root it out of my life forever.  Lent should be a movement closer to Christ and to the way of life He has exemplified.  If I am to do this, I need to know Jesus’ example concerning food.  I looked up scriptures that relate to Jesus’ teachings on food.  The points that struck me came from the Sermon on the Mount and the stories of Jesus feeding huge crowds with a small amount of food.
Therefore I tell you, do not be anxious about your life, what you will eat or what you will drink, nor about your body, what you will put on.  Is not life more than food and the body more than clothing?  Matthew 6:25
In Matthew 14, when the disciples were distressed about how they were going to feed the large crowds, Jesus said “…you give them something to eat.”  He did not ask the disciples to prepare a banquet, He told them only to give them some food.   “And they all ate and were satisfied.”

And in Matthew 16, when facing a similar crowd who had been without food for several days while they listened to Jesus preach, Jesus said “I am unwilling to send them away hungry, lest they faint on the way.”  He took the bread and fish that were available, “and they all ate and were satisfied.”

I glean several key points from these scriptures:
  •      Each time they ate, Jesus gave thanks for the food they had.  “He took the seven loaves and the fish, and having given thanks, he broke them and gave them to the disciples…” He didn’t pray for more food or different food, He just gave thanks for what He had.  I need to be thankful for the food I have – not just in an abstract way - but in prayer every time I eat.  I need to be truly grateful for the healthy choices I have, not wishing I had something else or something more.
  •      I shouldn’t worry about (plan obsessively) what I am going to eat.  A certain amount of planning and preparation is inevitable – I have to go to the grocery store to have food in the house, I have to pack lunch to take to work.  However, I don’t need to obsess about what I “get” to have.  Rather, I need to keep healthy snack options available at home and at work so that IF I NEED a snack, I have healthy options.  Planning my snacks in advance and eating them whether or not I’m hungry – just because I can – is not being obedient to God.
  •      …lest they faint on the way.”  Jesus was concerned about food only as a physical need.  He didn’t express concern that they might need a little snack to hold them or that they would enjoy some dessert.  He became concerned when it was possible that they would become ill if they didn’t eat soon. 
  •      “…they all ate and were satisfied.”  Satisfied – not stuffed.  They had “enough”.  Jesus does not promise, or even recommend, a smorgasbord at every meal.  We know that gluttony (excessive eating) is a sin.
  •      Both times that Jesus fed large crowds, “He directed the crowd to sit down,”   They didn’t eat while milling around, watching TV, reading a book or doing anything else distracting.  When offered a meal, Jesus directed them to sit down, give thanks and eat only until they were satisfied.
The Catholic Church calls for the practice of abstinence, fasting and alms-giving during Lent.  Though I am not Catholic, we agree on many points and I admire many of their methods and practices - the observance of Lent as a time of preparation is one.  So, with apologies to any practicing Catholics that I may be unintentionally offending, here is how I feel I should interpret those practices in my life:

Abstinence is the traditional “giving up” – Through God’s strength, I am giving up my unhealthy attitude toward and fixation on food.  I give it to God and I will not take it back at the end of these 40 days. In a more physical display, I am giving up all food outside my current healthy eating plan.  Yes, that's been my "plan" for the last year, and it has been successful in taking off 55 lbs., but not in changing my desire for food.  If I want to continue to lose and keep it off, I need to put food in the proper perspective:  Food is intended to sustain life.  That doesn't mean it can't be tasty, but eating should not be my hobby. Food is not my friend, my comforter, or my reward.

Fasting is more than a means of developing self control.  It is about finding aspects of ourselves that are not Christ-like and rooting them out.  It is an aid to prayer – as we feel the pangs of physical hunger, it reminds us of our hunger for God; that He is “the bread of life”.  By feeling hunger, we are reminded of Christ’s suffering.  The pangs should be a call to prayer to overcome my attitude toward food. 

Fasting is not a quick weight-loss tool or a way to build up willpower.  Isaiah 58 tells us that fasting without changing our behavior and attitude is not pleasing to God.  Through God’s strength, I will practice the Lenten fast as defined by the Catholic church (one “sparse and simple meal” – no meat - supplemented by two snacks as long as, together, they do not equal a full meal) on one day per week during Lent, as well as on Ash Wednesday and Good Friday.  

Alms-giving - Fasting or abstaining from certain foods is also intended to give us compassion for those who are hungry, not by choice, but because they cannot afford food.  That compassion should go beyond tossing a few dollars in a collection plate or making a donation to the food pantry.  I’m unsure how God will lead me in this area, but I will be collecting the money I would normally spend on eating out, buying prepackaged snacks, and buying groceries for the meals I am fasting.  In His strength, I will be prepared to use it however He leads.

Thursday, February 21, 2013

Sand, Sun, Surf . . . in Nebraska

News flash:  Since our Florida trip last month, I am beach-obsessed.  (Yeah, I know, that's not news.)  In an attempt to bring a little beach to Nebraska, we are creating a "beach bathroom".  Since replacing the vintage green tile isn't an option, we're incorporating it into the scheme and adding shells we picked up on the beach, a lighthouse-style lantern, new rugs, and two craft projects.


While we were in Florida, I visited the House of Refuge at Gilbert's Bar
The Houses of Refuge were designated as havens for shipwrecked sailors and travelers along the sparsely populated Atlantic coastline of Florida. Run by the United States Lifesaving Service, the Houses played a critical role in a time when sailing ships dominated the world commerce.
 It is a beautiful and fascinating place.  I'll let you discover the details from the website.  My point for bringing it up is that, while I was there, I purchased a map of shipwrecks along the Florida coast.  I didn't want the standard black, plastic poster frame, so Dave built a custom frame from chair-rail molding.  After several experiments on scrap lumber, I came up with the right painting technique.  Mitch spray-painted it for me - off white - then I rubbed on a "wash" of teal and taupe paint, mixed to the perfect combination of ocean blue and ugly-bathroom-tile green, and a little water.  After it dried, I sanded it down to bring a little of the undercoat through and create a weathered look.  
Not totally professional (my painting that is.  Dave's frame-building rocks).  I love it and Dave says it makes interesting reading for those who spend time "standing" in the bathroom.  And yes, I know, that's some green tile!
Original from Crafts by Amanda
Project #2 is based on a Pinerest find (and therefore counts as Pin #10 for Trish's Pin It/Do It Challenge).  

Amanda has a great tutorial on her site, so won't go into detail. These are surprisingly easy to make, provided you have the right tools - rough wood, sandpaper, craft paint, paint brush or paint pens and, most importantly, a helpful husband.


If you're handy with power tools, you can do this step yourself, but I found it much faster and simpler to get Dave to cut and sand the boards for me.  He even used a Dremel to create some "worn" areas.
Of course, all that work may require some refreshment.


When the boards are ready, just paint . . .
Letter - using Amanda's easy method that even a total non-artist like me can do.  
Tip:  If you decide to use a paint pen rather than brush, 
buy several because one will do approximately 2.36 signs.
Let dry, and sand lightly to fade lettering
 and create the look of years in the sun,wind and ocean breeze.  
Connect your signs with some rope stapled to the back, if you choose - and hang.

Now I just need a brilliant idea for window coverings . . .


Wednesday, February 20, 2013

The Ha-Ha by Dave King

Howard Kapostash has not spoken in thirty years. The small repertory of gestures and simple sounds that he uses to communicate lead most people to assume he is disturbed. No one understands that Howard is still the same man he was before his tragic injury. But when he agrees to help an old girlfriend by opening his home to her nine-year-old son, the presence of this nervous, resourceful boy in his life transforms Howard utterly. He is afforded a rare glimpse of life outside his shell—with all its exuberant joys and crushing sorrows.

I grabbed this audiobook at the library one day when I was in a hurry and just needed something playing in the car on a trip.  I lucked out.  What I got was very different from what I normally read and from what I expected.  

The story covers a very narrow window of time and place - 8 weeks in the limited world of Howard Kapostash - but it covers a wide expanse of emotion and ideas.  Hearing this story from the viewpoint of a man who can not communicate beyond a few basic hand gestures was frustrating - so much so that at times I was tempted to hit eject and move on to something happier.  But it was also intriguing.  Imagine life without ever being able to explain yourself. . . Howard could point to what he wanted on a menu, or tap his watch to indicate he needed to hurry, but he couldn't tell anyone why he was in a hurry.  He couldn't tell anyone how he felt about them, or why he was angry, or what had happened to him in Viet Nam.  When people misjudged him, or used him or assumed they knew what he was thinking, he couldn't correct them.  He couldn't stand up for himself.  

The interview with the author at the end of the audio version added some insight that you wouldn't get from reading the book, so I recommend that, if you chose to read rather than listen, you also read this interview with the author from Book Browse - but not till the end.

This is not an easy read, but it made a subtle change in the way I look at others - What is there in their life that I don't know and they can't tell me?  

February Pin It/Do It - Pin #9: 100 Calorie Snacks

Healthy eating has become routine at our house in the last year.  Now I have been asked to create and run a fitness program at work, so I'm searching for ideas to encourage healthy eating among my co-workers.  That search led me to a Pin of an article called Make Your Own 100-Calorie Snacks on Budget101.com.  

Here are the top 5 reasons to package your own snacks:

#5. It saves money.  Pre-packaged snacks are expensive.  By packing your own, you can take advantage of savings on economy sizes without the risk of products becoming stale because the package didn't get re-closed tightly after each use. Which ties into #4 - 

#4. It cuts down on waste.  If a bag of pretzels is evenly portioned into ten single-serve bags, you never end up with a few left in the bottom that aren't enough for a portion so they just sit there till they're stale and get thrown out. (Which takes us back to #5 - saves money)

#3. You can customize the portion size to your diet or your family.  If you need/want more than 100 calories in each portion - just package it that way.

#2. Convenience - Individual packs are easy for kids to grab after school or, for me, to pack in my lunch.

And the #1 benefit is:  Individual snack packs reduce the chances of over-indulging.  If I'm having a craving for chips and try to eat a "serving" straight from the bag, chances are I'm going to go beyond what I should have.  Even if I put the chips into a bowl, I'm likely to grab a larger portion than I really need to fill the craving.  And it ends "grazing" - standing in front of the refrigerator, snacking on a half a slice of cheese, a couple grapes, a bite of leftover turkey . . . while trying to decide what I really want.  If the snacks are stacked and waiting in pre-approved sizes, it's easy to choose and get no more than I need.

To teach this frugal, healthy habit to my co-workers, I prepackaged 100 snacks (ranging form 80-125 calories) and stocked the break rooms.  The were a hit!  Some people just appreciated free food, but many asked questions and expressed surprise at some of the serving sizes.  I packaged mostly low-fat, low-calorie options, but threw in a few - like Pepperidge Farms S'mores Goldfish - that illustrated an option for curbing a sweet/chocolate craving without blowing the daily calorie bank.  
Some of my 100-calorie Snack Packs:  Pretzels, Honey Wheat Pretzel Twists, Goldfish crackers, sugar-free angel food cake, turkey lunch meat and string cheese, beef jerky, mandarin oranges, apples and peanut butter, chocolate parfaits  . . . get more ideas on Budget101.com

I will admit it was time consuming to count out serving sizes.   When I do it for my own use I will probably count out the first serving of 40 goldfish into a measuring cup, then approximate the rest.  Since I was doing this for work, I wanted them to be exact, so I counted every fish.

I think the benefits of packaging my own snacks make it worth the effort, but a word of warning:  Eating all the broken crackers, chipped vanilla wafers, and crumbs of beef jerky while packaging is counter-productive.

Tuesday, February 19, 2013

Clothespin Apron Tutorial

A couple days ago, I posted about a clothespin apron I made from instructions I found on Pinterest.  I also intended to use the apron to earn a badge through Farm Girl Sisterhood.  However, when I read the badge requirements more thoroughly (I can hear my fifth grade teacher now "Read ALL of the instructions before you begin.") there was a 2-hour minimum time requirement.  Since I had just bragged about making that apron in less than 10 minutes, it obviously wasn't going to qualify.

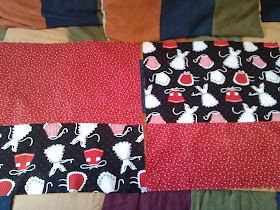
My next plan was to make one from my own fabric rather than a pillowcase - and I had the perfect piece waiting in the closet.  (You know, one of those pieces you buy because you know you have to make SOMETHING from it, even if you have no idea what.)  The hitch was that I didn't have enough of the gorgeous black and red fabric, so I found some red fabric with white stars for the back of the apron and inside of the pocket.  
Again, my enthusiasm overwhelmed my preparation.  Once the body of the apron was assembled, I found I didn't have enough of the black OR red fabrics to make the ties.  Another dig through the fabric stash unearthed a second red fabric - this one with small red hearts.  The three fabrics worked beautifully together and I ended up with a "tool belt" style apron that I love.  

You can certainly do this in all one fabric but I'm going to share my method to make the apron with contrasting lining.  

1.  Cut two 20x14 rectangles - one from featured fabric, one from lining fabric.  (We'll call These F1 and L1)
Cut two 20x9 rectangles - one from featured fabric, one from lining fabric. (These are F2 and L2)
2.  Lay F1 and L2 together along the 20" edge - wrong sides together.  Stitch, open seam and press.  If either of your fabrics has a pattern with a definite top/bottom, check the next picture to be sure you have everything facing the right way.  
Do the same with F2 and L1.  You should now have two panels that look like this:
Notice lower half of left panel is upside down.
It will fold up to create the pocket and will then be right-side-up.
3.  Line up the panels, right sides together and sew around three sides, leaving the top open (the edge that will be the top of your apron). Turn right-side-out and press seams.  You should now have a basic pillow case (remember this was originally a pillowcase apron).  

4.  Lay the pillowcase out, the F1/L2 side facing up - the top of this side will be the main panel of your apron, so make sure the correct fabric is on top.  Fold the bottom (sewn) edge up along the seam line to create the pocket.  Pin and stitch sides three edges (sides and bottom).   Find center of pocket and stitch a vertical line from top to bottom - creating two pockets.

5.  Turn 1/2 " of top edge to the inside and press.You have now completed the body of your apron.  It just needs ties.  

6.  Cut two strips 3"x45" (or width of fabric).  Pin, right sides together along short end, stitch and press seam open - creating a strip 3"x90".  Fold in half length-wise and sew along long edge.  Turn right-side-out and press.  

7.  Pin tie along top edge of apron body, matching center seam of tie with center of apron.  Top stitch along top and bottom edges of tie, stitching body of apron closed at the same time.  Try the apron on and cut ties to the length you need.  Turn ends of tie to the inside, press and top stitch closed.

Press, fill with clothespins and head to the clothesline.

Monday, February 18, 2013

February Pin It/Do It - Pins #6-8

Pin #6 - Rolled Paper Cross

When our son, Mitch, and his fiance visited earlier this month, Mackenzie and I found ourselves with a day with just the two of us home and weather that made us decide to hole up at home.  So we began searching for craft projects that we could do with the supplies on hand.  Mackenzie found several pins for these rolled paper crosses:
Saved by Love Creations                (uncredited pin)     
We set out to create our own version from old book pages.  The problem with this plan was that the pages tended to be brittle, so it cracked and broke when rolled.  But with much perseverance and a bit of mumbled cussing, we each created a reasonable facsimile of the projects we saw on-line. 
 Mackenzies' was larger and more ornate than mine - she's got more patience - but I forgot to take a picture before she left.  We agreed that they need a spritz of the clear glitter paint I used on paper Christmas stars - just to give them a little pizzazz. With the correct paper, this would be a quick, easy project.

Pin #7 - Coffee Cup Pincushion

I had admired several pincushions made from tea cups but didn't really plan to make one . . . until I was pondering a use for a pink flowered cup given to me by a dear friend who passed away in 2004.  The mug has developed a small crack so I'm afraid to drink from it for fear of losing one of only two gifts I have from her.  If someone on Pinterest can make a pincushion from a tea cup, surely I could make one from a mug.  Sure enough.  A Pinterest search showed dozens of examples. I'm not crediting one specific pin because they are all similar and mine is based on several sources.  I'm thrilled to have a way to safeguard this mug, yet still keep it visible and useful.  

Pin #8 - Another Pincushion

I do cross-stitch and other hand sewing from my favorite chair in the living room.  I have a bad habit of sticking needles into the arm of the chair while changing thread colors, then forgetting they're there and stabbing my hand - or worse yet, someone else's hand.  
Hopefully, this adorable armchair pincushion from Riley Blake Designs will end that problem - as well as keeping my scissors handy, and maybe even a pen and sticky notes for reading - a dual-hobby project.  


If you've seen any of my other craft posts, you know that I have issues with following a pattern - I have to tweek it here and there.  I found beautiful vintage-looking fabrics at Hobby Lobby and couldn't bear to cut them into squares for patchwork and lose the gorgeous designs.  So I made mine with a solid piece of fabric on top and used quilt batting rather than polyfill. 

On the inside, I anchored it to the chair with a couple straight pins. 
I love the way it turned out - beautiful and functional!
 I have one more pin completed, one nearly there, plus two recipes and two crafts left on my Pin It/Do It board . . . and only 10 days left.  I better get moving.

Saturday, February 16, 2013

I'm Dreaming of a . . .

No, I'm not dreaming of a White Christmas, though it is snowing here.  I'm dreaming of a green garden, fresh vegetables and beautiful flowers.  My mother used to tell me "Your eyes are bigger than your stomach" when I took a larger portion than I could eat.  When the seed catalogs arrive, my eyes are bigger than our garden.  So, we're making a bigger garden.  The idea is to move the vining crops - melons, squash and cucumbers -  across the fence, staking off a corner of the pasture where we can expand as far as we want/need, and let the rest spread out in the established spot.  
Dave does a little weeding, while Gabby and the girls look on (2012)
This is only our third year of gardening.  The first year was modestly successful, in that we actually got a few things to grow - not bad for beginners.  We learned some lessons and last summer was much more productive.  The second garden taught us additional lessons:  Rabbits will eat your entire pea crop unless you build a fence.  The pepper varieties we planted (twice) and that never showed so much as a sprout, are obviously not suitable for our climate/soil.  Okra grows profusely, but it's all still in the freezer because we only like it deep fried and we've given up most fried foods.  And 36 tomato plants is excessive for two people - one of whom doesn't care for tomatoes.       
                            
We also have plans for other areas of the yard:
photos from Gurneys.com
Raspberries will be planted along the pasture fence, Fragrant Cloud honeysuckle will adorn the trellis on the north end of the house, and a Nugget hops vine will make it's way up the side of the old chicken coop.  The hops is mostly for looks and curiosity, but Dave might even try a home brew.  

The flower beds will have the usual marigolds, petunias and geraniums, as well as some new wildflowers, a replanting of the hollyhocks killed by drought last year (thank heaven I saved some seed), and the most exciting new addition - Strawberry Blonde and Chianti sunflowers.
Images from Burpee. com
We buy most of our garden seed and bedding plants locally, so it remains to be seen if we lose control when we get there and try something new, but that's the plan for now.   What's in your garden dreams?