Showing posts with label Pin It/Do It. Show all posts

Wednesday, September 23, 2015

All Wrapped Up In One . . .


Creativity isn't just about the finished project,. Crafting, painting or sewing can create moments of beauty during an ugly time; memories with a good friend; or cheer during moments of loneliness.  All of those things were created at my house over the past few weeks.

While Amanda was home for her grandpa's funeral, she made me this beautiful sunflower wreath.  She had made one for herself - a little reminder of her Kansas roots while she's living in the dessert - and I requested one for my door. 


And speaking of Amanda, when she is at home in the dessert, she works with abused children.  With some help from my mom and my sister, we are furnishing each girl (and boys, if they choose) a doll and doll blanket.  This week I ran across kits for a "self-binding receiving blanket".  I didn't want to pay the price for the kit, but I found the instructions on YouTube from Missouri Star Quilt Co.   They advertise it as a 10-minute project.  It's closer to 30 when I'm doing it, but it's still a quick, easy way to make a binding with mitered corners.  I used the technique to finish some doll-size quilt tops, then made one from this adorable penguin flannel.  A yard and a quarter of both the flannel and the coordinating fabric makes four doll blankets.  I also threw in a few "dolly diapers".  


You had to know there would be a bag of some sort in my crafting.  This basket is just the right size to hold pencils, sewing notions or the TV remote.  My sister requested two to use as Easter baskets.  I found the pattern on Riley Blake Designs via Pinterest.


I cleaned out and sorted my fabric stash according to size - then went in search of projects on my Pinterest boards to use up some of the small pieces.  Some were more successful than others.

First up was this fabric "lily plate" from Michelle Made Me.  This project turned out to be more complicated than I expected.  I am marginally happy with the results, but I will make some adjustments in the technique before I try again. 


Fabric Christmas trees were a bust. They looked so cute in the pin from this blog but not so at my house.  Part of the problem is that I chose fabrics that are too similar and thus the tiers have very little definition.  The majority of the problem is that I thought it would be cute to fussy cut the top tier and center Santa's face.  It's not.  My trees look like The Nightmare Before Christmas meets The Coneheads.  I'll try again - some day - in better fabric choices.


My favorite new pattern was for these simple potholders.  These are a great way to use up scraps - especially leftover 2" strips - and there are dozens of color/arrangement combinations to make them unique. Best of all - no binding! 

For the top potholder, I used 4 strips each of three different fabrics, plus a fourth fabric for the center hexi and backing.  For the bottom version, I used two strips each of six fabrics and lined them up so that like fabrics touched.  I intend to make more of these and will probably add a second layer of Insulbright batting.  One layer isn't enough heat protection if you have to hold the pan for more than a few seconds.

There was more crafting as part of a Sister Weekend, but that's a post for tomorrow.  

This post is linked to Needlework Tuesday (hosted by Heather at Books and Quilts), Inspiration on Monday (hosted by Trish @ Love, Laughter and a Touch of Insanity, and Fall Pin It/Do It, also hosted by Trish.  And all of them at least a day late!  

Wednesday, October 30, 2013

Pin It/Do It: Quilted Basket

Seaside Stitches
"Quick and simple" seems to be the theme for my October Pin It/Do It entries.  This adorable little basket was done in less than an hour.  The original pin has easy to follow instructions.  This would be a great project for beginners of any age.  I plan to make more as Christmas gifts - fill with snacks, lotions, note pads and pen . . . lots of ideas for teachers, neighbors, co-workers, etc.  

My little coral box is on my desk at work, holding sticky notes.


The Pin It/Do It Challenge is hosted by Trish @ Love, Laughter and a Touch of Insanity.  Stop by and see what everyone is pinning and doing.  I signed up to do 8 pins this month, but I don't think I'm going to make it.  Only one evening left to craft and it will be spent completing my Halloween costume. The challenge may be over, but there will be plenty of crafting and sewing between now and Christmas.

Sunday, October 27, 2013

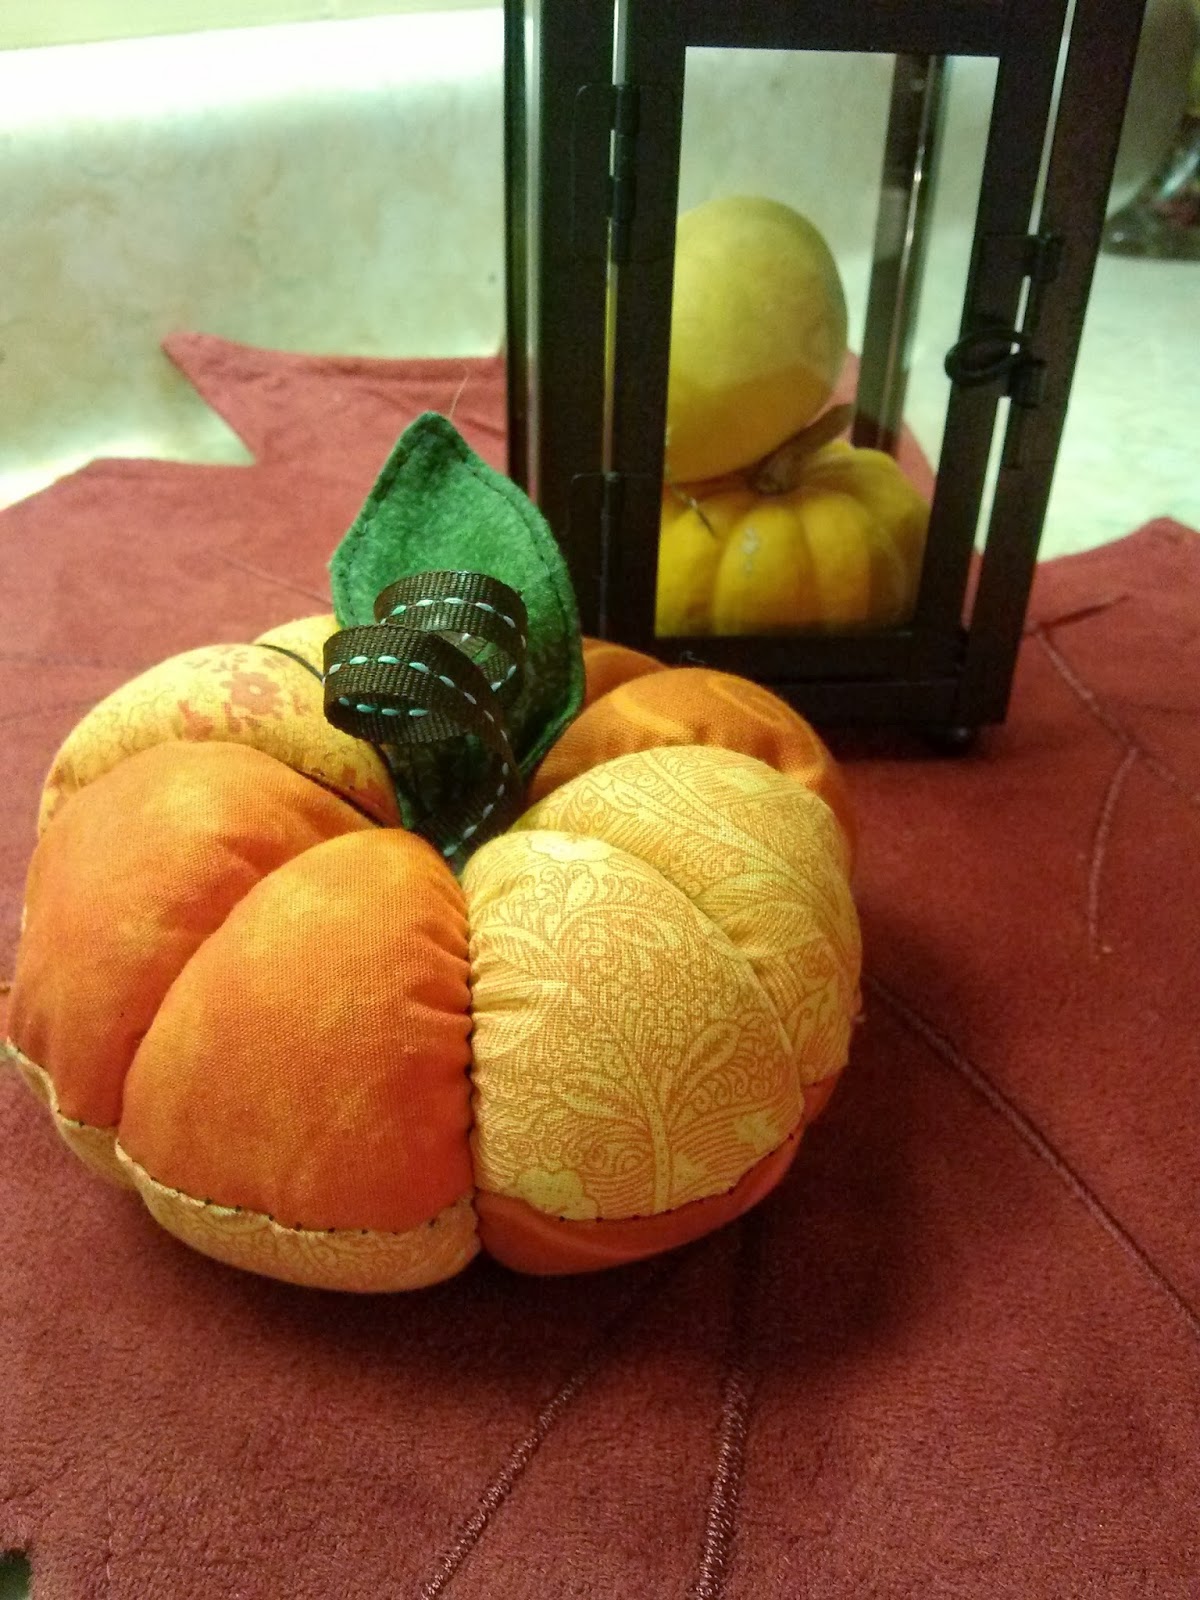
Pin It/Do It: Pumpkin Pincushion

Things we know about me:
Original Pin from Fiskars.com
  • I don't like Halloween.
  • I really likes Christmas (Seriously, a Christmas blog theme in October?).
  • I tend to skip over decorating or crafting for Autumn and go straight to Christmas.
But this little pumpkin pincushion was so cute, I had to try making one.  Turned out to be a very quick and simple project.

The instructions for curling the ribbon require starch, and I didn't have any, so I simply wound the ribbon around a pencil and steamed it several times with my iron, let it cool completely and slid off the pencil.  We'll see how long the curl holds.  Here's my version:

This project was under an hour - including time to dig through the scrap box for orange fabrics.  The original calls for two alternating prints, but I used four prints to use up some small scraps.  This is a great idea for a quick gift, or make them assembly-line style and whip up an entire pumpkin patch to use as table favors or craft fair items.  

Tuesday, October 15, 2013

Pin It/Do It: Christmas Table Topper

This post is doing double-duty for October Pin It/Do It and Needlework Tuesday.  I pinned this project quite awhile ago, but was undecided on fabrics.  I also had a collection of 5 Charlie Brown Christmas fat quarters that I wanted to make into something that didn't require cutting them up too small or the prints would get lost.  Behold the perfect combination.

The original pin called for a plastic wedge template for cutting the pieces but, because of my self-imposed $5 spending limit for this challenge, purchasing one was not an option.  Instead, I printed a Dresden Plate template off the internet, enlarged to the proper size on the copier, and squared the outside edges to get rid of the scallop.  It would be cute to leave the scalloped edge if you're talented at finishing. Not I!  My pattern called for 16 wedges rather than 20, as in the video.  This went together very easily and quickly.


The video shows a slick trick for getting the center piece perfectly round. 

Tip:  Be very (I mean VERY) consistent with your seam sizes.  A little too big or too small and your circle won't lay flat.  Of course the video calls for finishing the outside edge with bias binding.  And of course I didn't do it.  I hate binding.  I layered my finished top with cotton batting and the backing fabric and stitched the outer edge, leaving a space to turn.  If you look close, you can see that my circle puckers just a little bit in places - proving my point about consistent seam sizes. 

Also, don't try to sew as a distraction when upset.  I had just received news of the death of a co-worker who had been battling cancer and my mind was wandering.  The finishing isn't as good as it should be.  I'm debating ripping it out and restitching the outside edge, but most likely I'll just use it as is.


Here is the original Youtube video by Missouri Quilt Company:


If you missed yesterday's post, back up and check out my other sewing project this week.

Needlework Tuesday is hosted by Heather at Books and Quilts.
The October Pin It and Do It Challenge is hosted by Trish at Love, Laughter and a Bit of Insanity.

Sunday, October 13, 2013

October Pin It/Do It: Roll Warmer

 
from Virginia at Gingercake
I love vintage kitchen things, and I actually remember these roll warmers from years and years (and years) ago.  They are incredibly simple to sew and I'm sure there are many creative uses for things other than dinner rolls.  

Virginia's version calls for two coordinating prints, but my version uses four fabrics.  I had partial fat quarters left over from a throw pillow for our daughter's apartment, but none large enough to cut three 12" circles.  So I cut one each of three coordinates and three of the coral solid.  

I matched up 1 print circle and one coral to make the three required double-sided circles. 

Stitch together following Virginia's easy instructions, add three snaps . . .

snuggle a dinner roll into each pocket and you're ready for thanksgiving dinner.

I like the look of the three prints, but I also like the other examples on Gingercake that are one solid color.  I'll be making more of these.   Let me know if you have brilliant ideas for other uses.

The October Pin It and Do It Challenge is hosted by Trish at Love, Laughter and a Bit of Insanity.


Wednesday, October 2, 2013

October Pin It/Do It: A Sheepish Pin

This is such an easy pin that I almost feel guilty counting it for the October challenge. Almost. 

School teacher, Julie Joest, posted this picture of a project she assigned her class - create a card by drawing a doodle or Zentangle on an old book page, and glue to construction paper.

I didn't necessarily need a card, but loved the idea of Zentangling on old book pages.  Since I keep a box of books from an estate sale for just such crafting occasions, I tore out several pages and gave it a try.  I experimented with a couple types of paper, but the best result was on the porous paper rather than paper with a shiny finish.  I especially liked the look of the yellowed edges.   


I have no idea what I'm going to do with these, but then I have no idea what to do with an entire sketch book full of Zentangles.  But if a use ever comes up, I'm ready.  And we'll call that Pin #1 for October Pin It.

Visit Trish @ Love, Laughter and a Touch of Insanity to see what everyone is pinning and doing, or to join.

Wednesday, September 25, 2013

Pin It/Do It is Back

Now that Trish is a SAHM of two adorable little girls, she has TONS of free time to host fun challenges!   Don't throw things - I'm joking.  As a veteran SAHM, I know how little free time she truly has and I'm ecstatic that she is giving up part of it to host another Pin It and Do It Challenge.  Thanks, Trish!

If you've never seen the challenge before, here's how it works:

1. To participate, you will choose your level and then make (or do) that amount of pins during October 2013. Challenge ends October 31st.

2. Report back on your Pin It and Do It success. On October 1st I'll post a linky for you to link up. Ideally this will come in the form of a blog or tumblr post. Or you can post about it on Facebook or Flickr if you don’t have a blog or tumblr. Or create a board on Pinterest for this challenge. If none of the above, report your success in the Wrap-Up Post comments.

3. Anyone is welcome to join!

The Levels:
Timid Pinner: 1-3 Pins
Pinterested: 4-7 Pins
Pin Obsessed: 8+ Pins

I am jumping in at the "Obsessed" level because it's my favorite time of year and I have lots of ideas for Christmas gifts and decorations.  You can see my ideas on my Oct. PinIt/DoIt Pinterest board.  These are just ideas - I reserve the right to change my mind on a whim. 

Also - I'm adding an additional challenge to my plan.  A $5 spending limit.  I have plenty of fabric, paper, pens and other supplies to accomplish these pins.  I'm only allowing myself the $5 to cover thread or other notions that may come up.  I'll be inlcuding an "Amount Spent" in each of my Pin posts.

If you want to play along, visit Trish at Love, Laughter and a Touch of Insanity, and sign up.

Wednesday, May 29, 2013

May Pin It/Do It

May is nearly over and I haven't gotten as far as planned on my Pin It/Do It projects.  So far I've made Mason Jar Soap Dispensers, a 10-Minute Table Runner, and Lemon Fluff Freezer Cookies.  Then life got hectic, I worked some overtime, kids came home . . . and nothing got done for a few weeks.  Things have slowed down a bit and I managed to accomplish five easy pins this week.

 Fabulous Home Blog.

Pin #4 is a simple, but so cute, idea.  Wrap wire around the neck of a mason jar and hang from a hook next to the kitchen window for a place to display fresh flowers.  My window happens to have an unused curtain hanger, so I didn't even have to install a hook.  Add a few wildflowers and I have a lovely addition to my view as I wash dishes.
                          

Dreadlock Girl
Pin #5 was a fun paper craft.  I have no clue what they're good for except to be cute, but they're fun to make.  The original pin was made from a book page, which is part of what attracted me, but the pages in my old-book stash were too brittle, so I tried again from scrapbook paper.  I then made a smaller one from Christmas scrapbook paper to give in a Christmas ornament swap.  Dave made the little hangers to add a some more "cute" value.


static.artfire.com

Pin #6:  Pocket Prayer Quilts - You may have seen the full-size prayer quilts I've been working on.  I love them, but they are not always convenient in terms of time needed to make them and their portability.  When I was searching Pinterest for pattern ideas, I found these "Pocket Prayer Quilts".  They are a quick project that still has meaning.  There are multiple pins of this idea, but my favorite is this mini-9-patch idea.  There are no instructions with this pin - just the picture - so I made my 9-patch from 1 1/2" squares, so that it finishes as a 3" square.  I plan to make up several of these and keep on hand to tuck into a sympathy card or hand to a friend experiencing a tough time.

Each mini-quilt has a metal cross sewn inside (purchased at my local Christian book store for 50 cents each), and comes with a card with the following instructions:
 This pocket prayer quilt was made especially for you to slip in your pocket or purse.  Throughout the day, when your fingers touch the cross tucked inside, be mindful of God's grace for you.  Keep it as a tangible symbol of God's peace.

 Pins 7 and 8 are recipes - Roasted Asparagus with Lemon Parmesan Bread Crumbs, and Garlic Chicken

Cinnamon Spice and Everything Nice                                               Food.com
The asparagus was delicious - low cal, low fat, yet crispy and flavorful.  The chicken wasn't as impressive.  Although the original pinner said "This is freaking amazing", I didn't see much special about it.  I'm not a garlic fan so I cut down on the garlic and added Mrs. Dash chicken spice blend.  It was good, tasty even, but not "freaking amazing".

I have four pins left on my "to do" list for this challenge, but only one more day off work before the end of the month.  I better kick it in gear!

Friday, May 10, 2013

Pin It/Do It #3 - Lemon Fluff Freezer Cookies

One of my duties at work is to oversee the wellness program.  As part of that program, we had a healthy eating/exercise/weight loss competition during February and March.  One of the goals of the program was for the group as a whole - 30 participants - to lose 4% of their combined body weight.  And me made it!  We lost 283 pounds.  As a reward, I promised a healthy lunch for all participants.  When it came time to schedule the caterer, you should have seen the looks I got when I said "healthy, low-cal, low-fat".  And every bid returned with blah baked chicken and steamed vegetables.  That's exactly why people cringe at eating healthy!

So, I decided to do it myself.  I've cooked for 30 people before - piece of cake!  It turned into more of an ordeal than I anticipated, but that was mostly lack of planning on my part. Overall, it was a success.  Here is the menu I served:

Chicken Tacos:

  • tortilla
  • shredded, seasoned chicken
  • lettuce
  • tomato
  • onion 
  • low-fat cheese
  • salsa

Apple-Cabbage Slaw from Taste of Home

Pina Colada Fruit Salad from All Recipes

And Lemon Fluff Freezer Cookies for Pin #3 for the May Pin It/Do It Challenge.
Recipe from Keri at Shaken Together
 100 Calorie Lemon Fluff Refrigerator Cookies

2 bags Newton Fruit Thins (30 cookies each) - Lemon Crisp flavor
1 small tub of Lite Cool Whip  
1 cup cold skim milk
1 small box (3.4 oz) sugar-free, fat-free instant lemon pudding mix
1 teaspoon of lemon zest (optional but SO yummy)
Whisk together pudding mix and skim milk; allow to set for 30 seconds.  Gently fold in Lite Cool Whip and lemon zest, incorporating the pudding thoroughly.  Place in a piping bag fit with a large star tip.  Pipe approximately 2 tablespoons of lemon fluff filling on one cookie and place another cookie on top, pressing slightly.  Repeat until all cookies are filled.  Place in freezer until filling is set - at least one hour.  


Yield:  30 cookies

My store didn't have the Lemon Crisp flavored cookies so I used Blueberry Brown Sugar Newton Fruit Thins - still delicious!   I also didn't have a piping bag, but a zip lock bag with one corner snipped worked fine.  Be sure you get the zip lock portion actually zipped.  Not saying anything went awry - just a good idea to double check that. *wink*

They were a hit with the crew at work and I think they'll also be a hit with grandsons when they come to visit later this summer.

Monday, May 6, 2013

Pin It/Do It: 10 Minute Table Runner

During a fun sewing day a couple weeks ago, my friend, Jennifer, showed me how to make this quick and easy - yet adorable - table runner.  When I got home and ready to give it a try, I wanted to verify that I remembered Jenn's instructions correctly, so I checked Pinterest and found this pin with clear instructions:

From Amy @ Not Always With Thread
My first table runner was to be a gift so I chose a beautiful Americana print - cause who doesn't like Americana?  A half-yard of each fabric made two runners so I got to keep one.  Funny how that worked out. *wink wink*

I can't say I got a runner made in ten minutes, but it was certainly under 30.  I added top-stitching around the triangular sections on the ends to make them lay flatter.   This is a simple technique that could be adapted to make various sizes and is a great pattern to have at the ready when you need a last-minute gift.

Sunday, May 5, 2013

The May Pin It/Do It Challenge: Soap and Skirts

Trish is once again hosting a Pin It/Do It Challenge.  The title says it all - find something you have pinned on Pinterest, and do it.  It can be a craft, recipe, decorating idea, book you want to read - anything you have pinned.  I love these challenges for the motivation.  Dave even gets into it sometimes.

In fact, Dave helped with the first craft for this challenge:  Mason jar soap pump.  The idea came from a post by Julie on Babble, and it's pretty obvious.  Don't know why I hadn't thought of it before.  Drill a hole in the lid of a mason jar, insert pump, fill with soap.  Voila!  

I bought inexpensive soap from the dollar store to get the pump. The original instructions included painting the lid and ring, but I chose to leave mine as they were.  Dave drilled the hole with the largest bit he had, then reamed it to the proper size with a large metal punch.  This worked well because we could enlarge the hole in small increments until the pump fit in snugly.  On our second attempt the drill bit left some jagged edges that Dave smoothed with a Dremel.  This made the hole a touch too large, but a dab of glue handled that.  

My second project didn't come from a pin, it came from my mom.  She spotted these cute "candle skirts" at a friend's house during Christmas, created her own and gave me one to use as a pattern for making more.  The original was intended to use on a medium size pillar candle, but I don't use many candles in my home.  But aha! ..it fit perfectly on a mason jar so I combined the two ideas.  I'm not really a lace-and-bows kinda girl so my version is accessorized with ocean-themed charms in my beach-themed bathroom:     
                                          
Mom's version is created from a rectangle of fabric, laid wrong side up, top and bottom edges folded inward to overlap slightly  The lace is placed over the raw edges and top stitched - joining the edges and adding the trim all in one step.  A second row of stitching creates a casing for the elastic. Insert elastic, sew ends of fabric together and add bow (stitch or glue). 

Since I wasn't using any trim to cover the raw edges, I made a tube from two rectangles of fabric - the back is a coordinating print that is barely noticeable along the ruffle.  I then added rows of stitching to make the casing and hand-stitched the ribbon and charms.  If you would like more specific measurements and instructions, let me know and I'll post pictures of the process.

A second mason jar soap pump, skirtless so far, holds dish soap by my kitchen sink.  Now I'm picturing mason jars and skirts everywhere - holding buttons in my craft room, candy on the coffee table, homemade goodies as a gift . . . endless possibilities.  

Thursday, February 28, 2013

A Last Minute Pin and the Wrap-Up

Another Pin It/Do It Challenge is at an end, but I managed to slip one final project under the wire.  I signed up for an Easter swap on the Farm Girl Sisterhood, so I was browsing my Pinterest craft board for ideas to include.  I found this little basket from Ayumi at Pink Penguin:

With the right fabric, it could look Easter-ish, so I dug through my stash and found a cheerful floral and coordinating pink print.  I chose to skip the patchwork portion - mainly because I didn't want to dig for more fabrics.  I'm very happy with the finished project.  The base measures approximately 6"x4" and it's about 6" tall - perfect for holding a few Easter goodies.  Or - on the bathroom counter for makeup, in the sewing room for catching fabric scraps, on the end table to hold bookmarks, pens and sticky notes for reading.  I may be whipping up lots of these. The whole thing, including looking for fabric, took less than an hour.

Here's my finished basket.  If you happen to be my partner for the Easter swap, don't look!

The basket brings my total for the February challenge to 11.  

  1. Pillowcase Apron
  2. Iced Green Tea Lime Cooler
  3. Baked Zuchinni Sticks
  4. Gift Tags
  5. Georgia Peach
  6. Rolled Paper Cross
  7. Coffee Mug Pincushion
  8. Chair Arm Pincushion
  9. 100 Calorie Snack Packs
  10. Beach Signs
  11. Fabric Basket

The Pin It/Do It Challenges are hosted by Trish @ Love, Laughter and a Touch of Insanity.  They usually roll around every 3-4 months, so keep your eye on her blog or watch for an announcement here, and join in next time.

Thursday, February 21, 2013

Sand, Sun, Surf . . . in Nebraska

News flash:  Since our Florida trip last month, I am beach-obsessed.  (Yeah, I know, that's not news.)  In an attempt to bring a little beach to Nebraska, we are creating a "beach bathroom".  Since replacing the vintage green tile isn't an option, we're incorporating it into the scheme and adding shells we picked up on the beach, a lighthouse-style lantern, new rugs, and two craft projects.


While we were in Florida, I visited the House of Refuge at Gilbert's Bar
The Houses of Refuge were designated as havens for shipwrecked sailors and travelers along the sparsely populated Atlantic coastline of Florida. Run by the United States Lifesaving Service, the Houses played a critical role in a time when sailing ships dominated the world commerce.
 It is a beautiful and fascinating place.  I'll let you discover the details from the website.  My point for bringing it up is that, while I was there, I purchased a map of shipwrecks along the Florida coast.  I didn't want the standard black, plastic poster frame, so Dave built a custom frame from chair-rail molding.  After several experiments on scrap lumber, I came up with the right painting technique.  Mitch spray-painted it for me - off white - then I rubbed on a "wash" of teal and taupe paint, mixed to the perfect combination of ocean blue and ugly-bathroom-tile green, and a little water.  After it dried, I sanded it down to bring a little of the undercoat through and create a weathered look.  
Not totally professional (my painting that is.  Dave's frame-building rocks).  I love it and Dave says it makes interesting reading for those who spend time "standing" in the bathroom.  And yes, I know, that's some green tile!
Original from Crafts by Amanda
Project #2 is based on a Pinerest find (and therefore counts as Pin #10 for Trish's Pin It/Do It Challenge).  

Amanda has a great tutorial on her site, so won't go into detail. These are surprisingly easy to make, provided you have the right tools - rough wood, sandpaper, craft paint, paint brush or paint pens and, most importantly, a helpful husband.


If you're handy with power tools, you can do this step yourself, but I found it much faster and simpler to get Dave to cut and sand the boards for me.  He even used a Dremel to create some "worn" areas.
Of course, all that work may require some refreshment.


When the boards are ready, just paint . . .
Letter - using Amanda's easy method that even a total non-artist like me can do.  
Tip:  If you decide to use a paint pen rather than brush, 
buy several because one will do approximately 2.36 signs.
Let dry, and sand lightly to fade lettering
 and create the look of years in the sun,wind and ocean breeze.  
Connect your signs with some rope stapled to the back, if you choose - and hang.

Now I just need a brilliant idea for window coverings . . .